Posts

My Journey to Triple Boot: Windows, Arch Linux, and Ubuntu

September 24, 2025
Triple boot setup illustration
I've always been fascinated by the idea of having multiple operating systems on a single machine. What started as a simple desire to dual boot Windows and Linux eventually evolved into an ambitious project to triple boot my PC with Windows 11, Arch Linux, and Ubuntu. Today, I want to share my journey, the challenges I faced, and the solutions I discovered along the way. It all began with my curiosity about Linux. I was primarily a Windows user, but I kept hearing about the power and flexibility of Linux distributions. Dual booting seemed like the perfect solution - I could keep my familiar Windows environment while exploring the Linux ecosystem. My original dual boot setup with Windows 11 and Arch Linux worked beautifully. I loved the minimalist philosophy of Arch and the control it gave me over my system. However, as I dove deeper into Linux, I realized I also wanted to experience Ubuntu's user-friendly approach and its vast community support. Virtual machines just weren't cutting it for me. They felt sluggish and didn't give me the raw hardware power I needed for development work and system experimentation. That's when I made the decision that would lead me down a fascinating rabbit hole: I wanted to triple boot my machine. The problem was that every guide I found online focused on dual booting. Triple boot resources were either incomplete, outdated, or assumed a level of expertise I didn't have at the time. So I embarked on this journey through trial, error, and a lot of learning. Before diving into the actual setup process, I had to wrap my head around several key concepts that I hadn't fully understood during my dual boot journey. Let me share what I learned: One of the first things I discovered was how different operating systems handle storage differently. Windows uses NTFS file systems, while Linux distributions typically use EXT4. What fascinated me was that Windows simply cannot see EXT4 partitions - they're completely invisible to it. However, Linux can access NTFS partitions by mounting them, though I learned to be careful about Windows' fast boot feature, which can cause data corruption if not handled properly. This insight led me to create a shared NTFS partition that all three operating systems could access. While file operations on NTFS from Linux are slower than native EXT4 operations, it became my bridge between the different worlds. The ESP was a concept that initially confused me. It's a small, FAT32-formatted partition that stores the essential bootloader programs and utilities needed to start operating systems on UEFI systems. Think of it as the central command center for your computer's boot process. What I found remarkable is that you can actually boot a Linux system without a traditional bootloader if you install the kernel and initramfs directly on the ESP. However, for a multi-boot setup like mine, a boot manager becomes essential. This distinction took me a while to understand clearly:
  • A bootloader (like GRUB) is the program that actually loads your operating system into memory
  • A boot manager (like rEFInd) presents you with a menu to choose which operating system to boot and then hands control over to the appropriate bootloader
In my triple boot setup, rEFInd acts as the traffic director, while GRUB handles the actual loading of my Linux installations. The kernel is the heart of any operating system - it's the bridge between software and hardware. The initramfs (initial RAM file system) is a temporary file system loaded into memory that contains the essential drivers needed to mount your actual root file system and continue the boot process. Understanding these components helped me troubleshoot issues and make informed decisions during my setup process. Through my trial-and-error process, I developed some strong opinions about how to approach a triple boot setup. Here's what I wish I had known from the beginning: Before I even touched a partition tool, I made sure to:
  1. Disable Secure Boot - This was non-negotiable for my Linux installations
  2. Turn off BitLocker encryption - Windows' encryption would have complicated the process significantly
  3. Disable fast boot - This Windows feature can cause data corruption when Linux tries to access NTFS partitions
If you're planning to encrypt your Linux installations, I learned the hard way that you need to disable encryption during the initial setup process. You can always enable it later once everything is working. Based on my experience, here's how I allocated my storage:
  • Windows 11: 500GB - I was generous here because Windows tends to grow over time with updates and applications
  • Each Linux root partition: 150GB - This proved to be more than enough for the operating system and essential software
  • Shared NTFS partition: 200GB - This became my bridge for sharing files between all three operating systems
  • Dedicated Linux data partition: 500GB (EXT4) - I created this exclusively for one of my Linux installations to store development projects and games
This last point about dedicated storage became crucial when I started gaming on Linux. If you mount partitions manually each boot instead of setting them up permanently in /etc/fstab, Steam and other gaming platforms lose track of your game files. Having a dedicated, permanently mounted partition solved this issue completely. A few things to keep in mind before starting:
  • Backup everything important - I learned this lesson the easy way by reading about others' disasters
  • Have recovery media ready - Both Windows installation media and Linux live USBs saved me more than once
  • Document your partition layout - I took screenshots of my disk layout before making changes
  • Test your setup gradually - I got my dual boot working perfectly before adding the third OS
My dual boot journey with Windows 11 and Arch Linux was actually quite straightforward, but it taught me valuable lessons that made the triple boot possible. Here's how I approached it: I started with a fresh Windows 11 installation on my primary drive. Once I had Windows set up and running smoothly, I used Windows' built-in Disk Management tool to shrink my Windows partition and create unallocated space for Arch Linux.
  1. Created the bootable media - I used Rufus to burn the Arch ISO to a USB stick
  2. Booted from the USB - Accessed my UEFI boot menu and selected the USB drive
  3. Followed the Arch installation - This was actually my second attempt at Arch, so I was more confident this time
When I reached the partitioning step, I made two crucial decisions:
  1. Root Partition: I created a new EXT4 partition in my unallocated space and mounted it at / (root)
  2. EFI System Partition: Instead of creating a new ESP, I used the existing one from Windows and mounted it at /boot
This second decision was key - by sharing the ESP between Windows and Linux, I was laying the groundwork for my future triple boot setup. For the bootloader installation, I installed GRUB to my Arch root partition rather than the ESP itself. This approach:
  • Kept my boot setup clean and organized
  • Avoided overwriting Windows' boot files
  • Made it easier to manage multiple Linux installations later
After completing the installation and rebooting, I could access both Windows and Arch Linux through my motherboard's UEFI boot menu. It wasn't the most elegant solution, but it worked perfectly and gave me confidence to proceed with the triple boot. While my dual boot setup worked, constantly accessing the UEFI boot menu wasn't ideal. I needed a more elegant solution that would scale well when I added the third operating system. That's when I discovered rEFInd. rEFInd is a boot manager, not a bootloader - and this distinction became crucial for my setup. Here's what made it perfect for my needs:
  • Automatic detection: rEFInd scans all available partitions and automatically finds bootable operating systems
  • Beautiful interface: The graphical menu looked professional and was easy to navigate
  • Flexibility: It could work alongside existing bootloaders like GRUB
  • Scalability: Adding new operating systems wouldn't require manual configuration
Installing rEFInd was surprisingly straightforward, but I had to be methodical about it:
  1. Booted into my Arch Linux installation - I could have used a live USB, but I was more comfortable in my existing Linux environment
  2. Downloaded rEFInd - I grabbed the binary zip file from the official rEFInd website
  3. Identified my ESP - I needed to locate my EFI System Partition. In my case, it was /dev/nvme0n1p1
  4. Mounted the ESP:
    sudo mkdir /mnt/esp
    sudo mount /dev/nvme0n1p1 /mnt/esp
  5. Extracted and installed rEFInd:
    cd ~/Downloads
    unzip refind-bin-*.zip
    cd refind-bin-*
    sudo ./refind-install --usedefault /mnt/esp
  6. Verified driver installation - The installation script automatically copied the necessary drivers, including ext4_x64.efi, to /mnt/esp/EFI/refind/drivers_x64/
After unmounting the ESP and rebooting, I was greeted by rEFInd's clean, graphical interface. It had automatically detected both my Windows installation and my Arch Linux setup. The transition from accessing the UEFI menu to having a proper boot manager felt like a major upgrade. What impressed me most was rEFInd's intelligence - it didn't just find my operating systems, it also detected my Linux kernel versions and presented them as separate options. This gave me the flexibility to boot into older kernels if needed. With rEFInd working beautifully for my dual boot setup, I felt confident enough to add Ubuntu to the mix. This is where the real challenge began - and where I had to be extremely careful about my partitioning decisions. I booted into my Arch Linux installation and used GParted to shrink one of my existing partitions, creating new unallocated space for Ubuntu. The key was making sure I had enough room not just for the root partition, but also for my planned shared and data partitions.
  1. Created the Ubuntu installation media - I used a standard Ubuntu Desktop ISO burned to a USB stick
  2. Booted from the USB - The Ubuntu installer's live environment was familiar and comfortable
  3. Reached the critical partitioning step - This is where my preparation and understanding of the ESP concept became crucial
When I reached the Ubuntu partitioning screen, I selected "Something Else" to get manual control over the process. Here's where I had to be extremely careful: For the root partition: I created a new EXT4 partition in my unallocated space and set its mount point to / For the EFI System Partition: This was the make-or-break moment. Instead of creating a new ESP, I found my existing ESP (the small FAT32 partition shared by Windows and Arch). I selected it, set its mount point to /boot/efi, and crucially made sure the "Format" checkbox was unchecked. This decision meant all three of my operating systems would share the same ESP - exactly what I wanted for a clean, manageable setup. When the installer asked where to install the GRUB bootloader, I made another strategic choice. Instead of installing it to the ESP (which could potentially overwrite rEFInd), I installed it to Ubuntu's root partition. This approach:
  • Preserved my rEFInd installation
  • Kept each OS's bootloader isolated
  • Allowed rEFInd to automatically detect Ubuntu's kernel
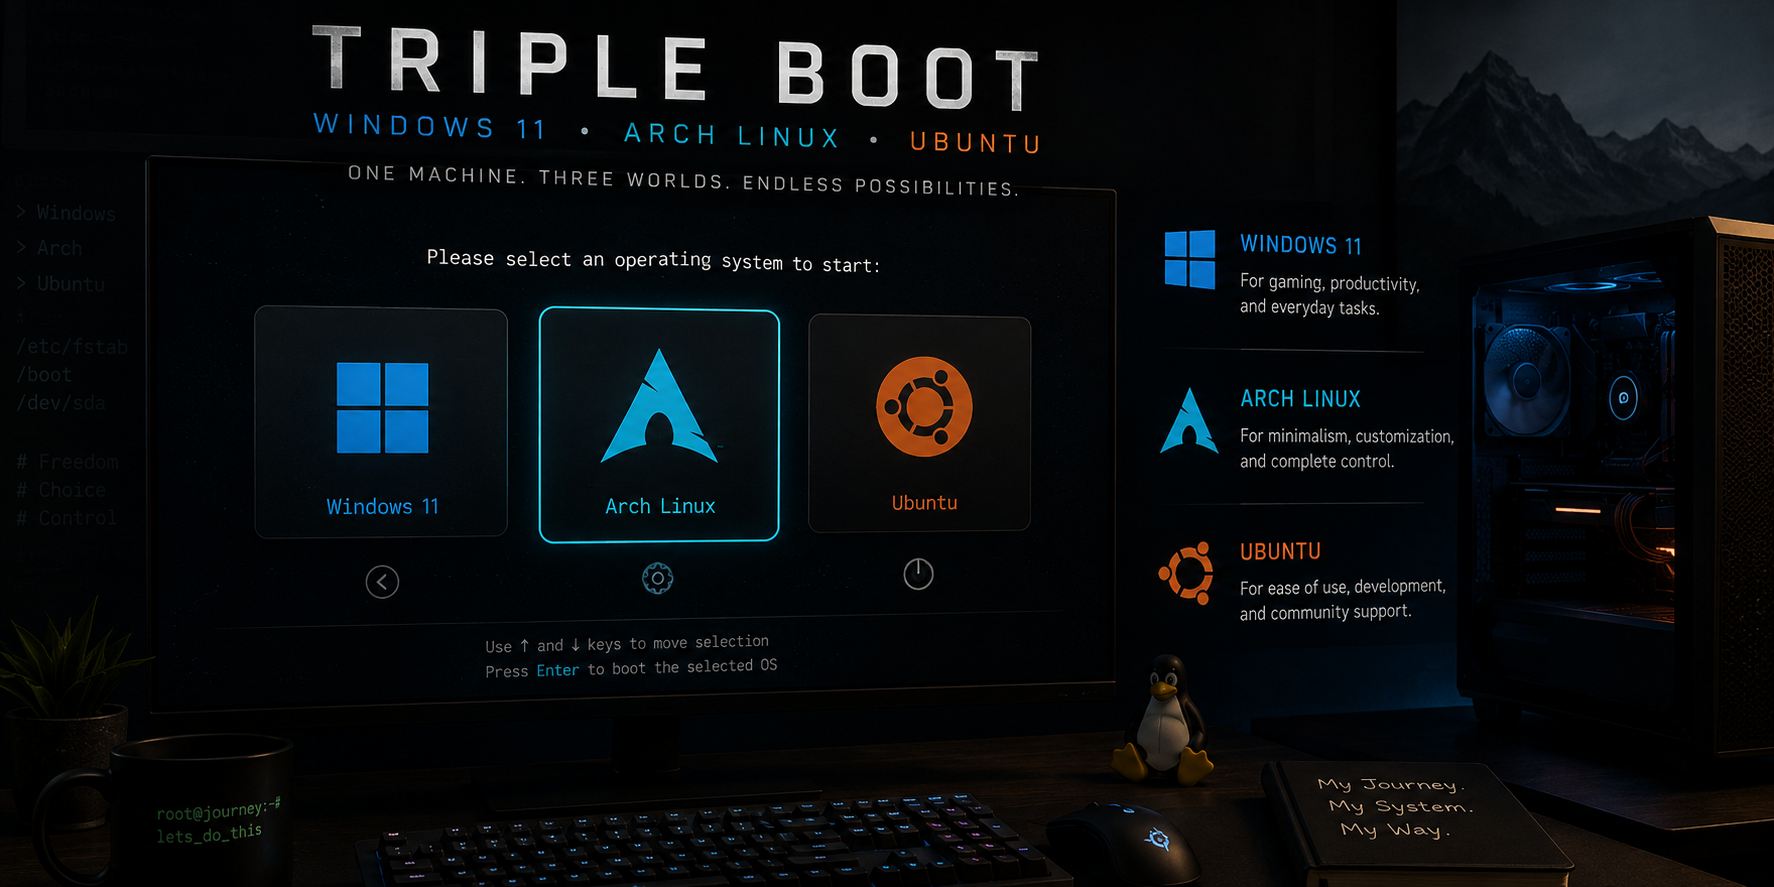
After completing the Ubuntu installation and rebooting, I held my breath as the computer started up. Success! rEFInd's boot menu now displayed three options:
  • Windows Boot Manager
  • Arch Linux
  • Ubuntu
The auto-detection had worked flawlessly. rEFInd had automatically discovered my Ubuntu installation and added it to the menu without any manual configuration on my part. Over the following days, I made a few adjustments:
  1. Configured permanent mounts - I added my shared NTFS partition and Linux data partition to /etc/fstab on both Linux installations
  2. Set up cross-OS file sharing - The shared NTFS partition became my bridge for transferring files between all three operating systems
  3. Organized my data - I moved my development projects to the dedicated Linux data partition to ensure fast I/O operations
Looking back at this journey, I'm amazed at what I accomplished. Every morning, I'm greeted by rEFInd's elegant boot menu, giving me the choice between three complete operating systems:
  • Windows 11 for gaming, Adobe Creative Suite, and when I need specific Windows-only software
  • Arch Linux for my development work, system administration learning, and when I want complete control over my environment
  • Ubuntu for its excellent hardware compatibility, when I need to quickly set up development environments, or when I'm working on projects that benefit from Ubuntu's extensive package repositories
The benefits of my triple boot setup have exceeded my initial expectations: I can test applications across different Linux distributions without the overhead of virtual machines. This has been invaluable for my development projects, allowing me to ensure compatibility and performance across different environments. Having access to both Arch and Ubuntu has accelerated my Linux learning curve. Arch taught me the fundamentals and gave me deep system knowledge, while Ubuntu showed me how a polished Linux desktop experience should feel. Running games natively on each OS gives me the best possible performance. Windows handles my AAA games and VR setup, while Linux gaming through Steam Proton has impressed me with its compatibility and performance. Whether I'm doing web development, system administration, content creation, or client work that requires specific software, I have the right tool for the job without compromising performance. If you're considering a similar setup, here are the key insights from my journey:
  1. Start simple - Get your dual boot working perfectly before adding complexity
  2. Understand the fundamentals - Take time to learn about ESP, bootloaders, and file systems
  3. Plan your storage carefully - Think about how you'll share data between operating systems
  4. Backup everything - Have recovery plans for when (not if) something goes wrong
  5. Use a boot manager - rEFInd made managing multiple OS installations effortless
  6. Document your setup - Keep notes about your partition layout and mount points
This journey taught me that triple booting is absolutely achievable with the right approach and understanding. The online resources for dual booting are excellent, but triple boot information is still scattered and often incomplete. If you're considering a similar setup or run into challenges during your own triple boot journey, I'd love to help. Feel free to reach out to me at contact@ryder.pro, and I'll do my best to assist you based on my experience. The freedom to choose the right operating system for each task, the learning opportunities, and the sheer satisfaction of having a perfectly configured multi-boot system make this one of my favorite technical projects. Your computer is capable of so much more than running just one operating system - why not unlock its full potential?